Mortal Kombat HD Remix with MUGEN

Hi Bleed, few crits for Cage if I may. He looks taller probably bacause you slimmed him down compared to original sprites;

http://img856.imageshack.us/img856/46/89497430.jpg

I don't see this as a problem as long as he's in correct relation with other characters in size. I think it would be best if you compare and adjust other characters to Scoprion (for example Liu Kang is smaller than Scorpion, Raiden bigger, Cage about the same size, etc.)

His head looks too small I think, and about hair... I see you experimented with it on your last few wip pics, but in my humble opinion your first try some months ago looked best:

cage12.jpg

I loved this. Did this direction get abandoned?
 
I'm just trying to get it looking better with a real hair sim. The low poly method still seems like the best, I kind of like how it's starting to look now with the sim, but it's too hard to work with and loads really slow.


I'm wondering if there is a way to use few real hair guides, and have them generate polygon strips with hair textures on it.
 
I think I get what you mean, but not too sure. Do you want to take the hair fiber information and make a map with it to project on a low poly hair mesh? If that is what you're talking about, my teacher did show me a process of using simple shapes, like bullets, to copy the mesh data and project it on a flat surface with a bump mapping effect. I'm not too sure though if this will work for hair, but if that is what you mean I can ask him about it.

I also kinda know an opposite way that I did in Maya. I used the low poly meshes, copy the edge flow, and convert that into curves, then the curves into hair fibers. Its a pretty effective way to create hair flows and styles and all that cool stuff.


EDIT: never mind, I re-read what you posted and I see what you mean now
 
left pillar and big pillar in the far back are not visible
Well, it can be visible in MUGEN because of wide resolution.

Played with drawings palette, although sprites were different.
Fixed brightness/contrast, changed colors, improved angles.
354c36a21c9a.png
 
Last edited:
You can do it in Zbrush with the brush that draws a mesh on to the surface. I forget what it's called, but I think it the one you say that draws bullets and other stuff on a model when you click and drag. I tried it for placing polygon hair strips on a head. It worked great for getting them on there, but the UV info is erased...
 
I think you're talking about the curve surface brush, or maybe an insert brush? I wanna say I saw a youtube video of the curve surface doing that.

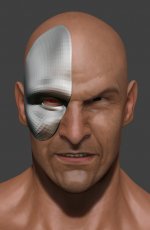
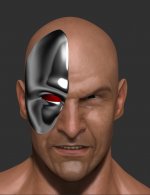
Tried to play around with a chrome material:

55.jpg
 
^That's great, here's select screen and endings in hd size:

Select
msndpe.png


Ending 1
3469hz9.png


Ending 2
2isftlj.png


Ending 2 might be tricky because of the differen clothes.
 
Hi. I'm making MKMegatrilogy project. Someone on page 103 asked, how did make Shang Tsung MK3. Well, to be honest, I used as a base Juano's Shang MK2, but I modified him a lot - changed characters and combat system to MK3 one, with adding combos and running and I added green lumination along with different blood colors to Sheeva and cyborgs. I also came up with an idea of fiendships, changed intro, and more.
I also made some minigames, one is Test Your Might (this time without any "base"):
http://www.youtube.com/watch?v=sTF1uu1s3as&list=UUAXfuJm1Zwui1dSFDEkb1Rw&index=2
So I can help you in coding this minigame and the tower if you need to. In 7:40 you can see, that I can even make 2 player Test Your Might.
 
Last edited:
I'm just trying to get it looking better with a real hair sim. The low poly method still seems like the best, I kind of like how it's starting to look now with the sim, but it's too hard to work with and loads really slow.


I'm wondering if there is a way to use few real hair guides, and have them generate polygon strips with hair textures on it.

I just found the best way to do it, I did liu kang's hair again with that method and I think looks great I will post an update today so you can see the final results-

to me the best way to do it is:

1.-make a copy of you model.
2.-detach the part of the head where the hair should be
3. now for example you will detach again from the shape created in step 2 a portion of polygons for example... just the back part and you will have a separate peace like the nape
4.- apply hair and fur modifier to that shape (nape) and use the style brush, scale it or whatever you need.
5.- from that nape part... detach again what can be the hair in left and right side, above the ears and repeat step 5
6.- depending on you character's hair style you can detach a big portion for on side and the back of the hair and repeat step 5
7.- at the end you will have just the part where the top right hair should be..... apply step 5 and you're done..

I don't know if is clear what I just said du to the language barrier but I leave you a video where you will see what I mean... go to second 1:40 and you will see how to do it.... and believe me. it's easear than using zbrush, splines or polygon hair... and at the end you still can use dynamics...

 
Last edited:
Hi Wrath911,

We can't officially acknowledge in anyway how this game would get to the fans. Stick around and ask us again six months from now when we will hopefully have more freedom to answer your question.
 
Gah! You lost me. I was following what you meant until step 7. I am very interested in this method.


I just found the best way to do it, I did liu kang's hair again with that method and I think looks great I will post an update today so you can see the final results-

to me the best way to do it is:

1.-make a copy of you model.
2.-detach the part of the head where the hair should be
3. now for example you will detach again from the shape created in step 2 a portion of polygons for example... just the back part and you will have a separate peace like the nape
4.- apply hair and fur modifier to that shape (nape) and use the style brush, scale it or whatever you need.
5.- from that nape part... detach again what can be the hair in left and right side, above the ears and repeat step 5
6.- depending on you character's hair style you can detach a big portion for on side and the back of the hair and repeat step 5
7.- at the end you will have just the part where the top right hair should be..... apply step 5 and you're done..

I don't know if is clear what I just said du to the language barrier but I leave you a video where you will see what I mean... go to second 1:40 and you will see how to do it.... and believe me. it's easear than using zbrush, splines or polygon hair... and at the end you still can use dynamics...

 
Never saw that Interloko did this. I thought he had mentioned he was having difficulty implementing TYM into the actual game though. I could be wrong.
 
I think, video in my previous post is adequate argument.
In this project developer just created empty enemy. It's more easy way then interloko used in MK1 remake.
 
^That's great, here's select screen and endings in hd size:

Select
msndpe.png


Ending 1
3469hz9.png


Ending 2
2isftlj.png


Ending 2 might be tricky because of the differen clothes.

Thank La_Luna. The ending shouldn't be too bad since its a simple trench coat. The gun will be more of a pain since I hate hard edge modeling, but I need to practice it anyways
 
Top