You are using an out of date browser. It may not display this or other websites correctly.
You should upgrade or use an alternative browser.
You should upgrade or use an alternative browser.
Mortal Kombat HD Remix with MUGEN
- Thread starter Spawn16
- Start date
arq_hawkin
New member
I've been messing with the hair simulator in Max, but I don't think it's going to work. It's way too hard to control, and takes too long to render. Polygon strips like they do in games, is still my best option.
I tryed too, but using the hair brush to adapt the fibers to your hair style is too difficult, I'm trying another method, if it works I'll tell you how to do it... the picture you posted, is real hair or planes with opacity maps?
No. Wrong place for this.
can someone help me pls thank you...
1. i have mkbs style original new pit pcx in fightfx.sff
2 i was think if i change prison begin action with mksb pit begin action number working
3
.I changed prison Begin Action number with mkbs Begin Action number in fightfx.air but Not Working VeryWell.eveythink mixed.
i waiting help from bleed,lean.interloko,junano
MortalLevent
New member
sorry someone can help me from privite message
again sorry
again sorry

I quote posts so people know who I'm responding to.
Someone posted "wrong place" and quoted entire post. xD
Please stop asking. This is THE WRONG thread for your questions. Don't apologize, just stop asking.
sorry someone can help me from privite message
again sorry
Ok, I feel your pain Bleed and Arq. Bleed in your case you just need a new computer nothing I can tell you will make your renders faster.
1.) I've found the best method is to use multiple version of the Hair and Fur Modifier on the same scalp.
2.) For most characters this means 3/4 modifiers. 1 for the back part of the hair. 1 for the left side part. 1 for the right side part. and maybe 1 for the sideburns or shorter hairs.
3.) I use zBrush fiber Mesh to sculpt the three different parts independently. Then export as curves out of zBrush. Import those curves in 3ds Max, (be sure to check import as shapes).
4.) Near the top of each hair and fur modifier in the "TOOLS" section you'll see "Recomb from Splines" Click that button then select the Hair guides you imported from zBrush. You'll need to increase your hair segments to at least 16 for this to work the way you'd expect it to. The really cool thing here is that by having the hair Auto Comb into the position you'd like it, you maintain the ability to have hair dynamics without needing to use Hair and Fur Modifiers clunky combing tools. Basically zBrush is where you comb your hairs into the proper position.
5.) Now for shorter hairs in the side burns and the scalp, you are going to want paint a special hair map from within zBrush. After loading your character within zBrush paint a majority of the face Black with polypaint. Paint the area where you'd like short hairs to show as white. To get that soft transition between more hair and less hair you'll want to soften the white to black transition into neutral gray.
Save poly paint, clone it, flip V, export to PSD or TIFF.
6.) Back in Max in the Hair and Fur modifier within General Parameters you'll notice a parameter called "Density" and next to it is a slot for a map. Place your new hair guide map in this slot. Now you have much greater control over exactly where the hair shows and you should notice a nice transition in the amount of hairs that show in scalp and side burn areas.
Hope that helps.
I tryed too, but using the hair brush to adapt the fibers to your hair style is too difficult, I'm trying another method, if it works I'll tell you how to do it... the picture you posted, is real hair or planes with opacity maps?
I tryed too, but using the hair brush to adapt the fibers to your hair style is too difficult, I'm trying another method, if it works I'll tell you how to do it... the picture you posted, is real hair or planes with opacity maps?
arq_hawkin
New member
Ok, I feel your pain Bleed and Arq. Bleed in your case you just need a new computer nothing I can tell you will make your renders faster.
Hope that helps.
thanks a lot cal, really helpfull, I'll try to post something later, and about the zbrush model, sorry, I haven't uploaded it cause the last version I have in here in my job's computer but I have dropbrox in my house and I've been sooooo busy, that's why I haven't post anything, I still working on liu but I haven't do anything that big for sharing.
KSMEDIA wanted us to share his announcer's voice renditions see below. Thoughts and comments are welcome:
https://www.dropbox.com/s/jl8q3gcxjuy6kxi/MKHDtsungVoiceSamples.aif
https://www.dropbox.com/s/jl8q3gcxjuy6kxi/MKHDtsungVoiceSamples.aif
AntrAcsA
Member
I was have a bit free time after work and and i'm remove the background and some a noise from the photos.Two high res photos of that temple:
http://img854.imageshack.us/img854/171/dsc07419q.jpg
http://img69.imageshack.us/img69/4369/p10400091cm9vc0.jpg
Le@n is that the photo of the smaller temple? I can't tell, it's too small in the original game
http://img716.imageshack.us/img716/3028/dsc07419q.png
Do not worry! I just removed the background. Everything else, every detail of the building is intact

I was starting to hide and the tourists, but has some work to do ,maybe letter will finish it , you need it .
@cal , the voices are spot on
") Just " FINISH HIM" need a bit work ! Well done .
Just " FINISH HIM" need a bit work ! Well done .
Last edited:
Thanks for your help AntrAcsa but I was already doing this. I can remove the people if you think you can even see them but from far away I doubt they will be very visible.

I was have a bit free time after work and and i'm remove the background and some a noise from the photos.
http://img716.imageshack.us/img716/3028/dsc07419q.png
Do not worry! I just removed the background. Everything else, every detail of the building is intact
I was starting to hide and the tourists, but has some work to do ,maybe letter will finish it , you need it .
@cal , the voices are spot on
Le@N
Member
Looks better, I hope you'll replace forest later.
I still think AntrAcsA should continue his work..I'm sure it will look better without people.
Thanks cal, I was checking the Maya hair today and it's very different. Better I think, from just playing around with it and renders a lot faster. Looks like every line is a clump, and you have to make a ton of these lines to control each clump.
Because in Max, the hair blends between few lines, I didn't think to make a line for every clump. Looks like this is what you mean, by creating the hair in Zbrush and using that as my guides.
I'll give this a try.
Because in Max, the hair blends between few lines, I didn't think to make a line for every clump. Looks like this is what you mean, by creating the hair in Zbrush and using that as my guides.
I'll give this a try.
arq_hawkin
New member


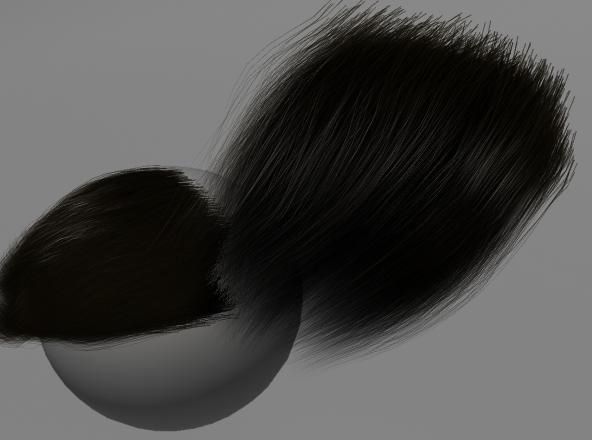
HELLO!!! I'm back, I just wanted to show my first try with hair and fur in max, THIS IS JUST A WIP UPDATE, I know there's still much to do sooo.. comments are welcome...
DjangoJustin
New member
KSMEDIA wanted us to share his announcer's voice renditions see below. Thoughts and comments are welcome:
https://www.dropbox.com/s/jl8q3gcxjuy6kxi/MKHDtsungVoiceSamples.aif
This isn't bad. Sounds almost identical to Psylense's version though. A bit too much echo, also.
Using Max Hair and Fur? Either way, I think this looks awesome.
View attachment 4840View attachment 4841View attachment 4842View attachment 4843View attachment 4844View attachment 4845View attachment 4846
HELLO!!! I'm back, I just wanted to show my first try with hair and fur in max, THIS IS JUST A WIP UPDATE, I know there's still much to do sooo.. comments are welcome...
Maya hair and Fur should be Shave and a Haircut which was formerly a plugin. As far I know Joe Alter, I think his name is created both the version for Maya and the version for Max so they should be identical, but I could totally be wrong here especially if Maya is rendering faster.
You are exactly correct with what I was attempting to say. Either way if it is slow Maya may be the better bet. I'm pretty sure you can use the same zBrush curves as guides method is Maya as well so it should be the same.
You are exactly correct with what I was attempting to say. Either way if it is slow Maya may be the better bet. I'm pretty sure you can use the same zBrush curves as guides method is Maya as well so it should be the same.
Thanks cal, I was checking the Maya hair today and it's very different. Better I think, from just playing around with it and renders a lot faster. Looks like every line is a clump, and you have to make a ton of these lines to control each clump.
Because in Max, the hair blends between few lines, I didn't think to make a line for every clump. Looks like this is what you mean, by creating the hair in Zbrush and using that as my guides.
I'll give this a try.